Hey there! It’s that time of the year again, and your garage door is begging for a little TLC. Don’t worry, I’ve got your back. Let’s dive right in, and I’ll show you how to perform your annual maintenance like a pro.
Download our Free Garage Door Inspection Checklist to streamline the your maintenance!
Step 1: Disconnect and Balance Check – It’s Easier Than You Think!
First things first, we need to disconnect the motor. Just pull that red release, and your door is in manual mode. Simple, right?
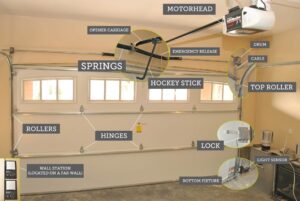
Now, here’s where you get hands-on. Carefully check the balance. If your door feels heavy, it might be a broken or tune-up spring that needs a little love. A good door should balance at any point of the lift. If something feels off, don’t hesitate to call us. Trust me, it’s worth it.
Step 2: The Art of Lubrication – Slippery When Done Right
Now, let’s move that door-side shift to one side. Grab your petroleum-based lubricant (check the ingredients!) and prepare to make that door glide like new.
Here’s a pro tip: Keep a rag handy for overspray. You can’t over-oil, but you can make a mess.
Start with the roller shaft, and don’t be shy with the oil. But, and this is crucial, avoid overspray into the track. If you do, make sure to clean it. You don’t want grime building up over time.
See that little slit on the roller? That’s your window for lubricating the inside. Hit all the shafts, spray a little on the roller, and work your way to the eyelets.
Repeat on the other side, and you’ll feel it improves as you go. This makes a world of difference.
Step 3: Spring Into Action – Lubricating the Heart of Your Door
Your torsion springs are located overhead. Spray them at the top (watch for overspray if you have a nice finished garage!). Over oiling? It’s not a problem for the garage, but it might make a mess on your door. A higher viscosity lubricant will stay there longer, giving those springs a new lease on life.
If you have two springs, repeat on the other side. Let the oil work its magic.
Step 4: No Mess, No Fuss – Handling the Rail and Chain
You might be tempted to lubricate the roller chain or grease under the rail. Hold on a minute! In my experience, it often just makes a mess, and I’ve rarely seen chain rails fail before the motor does. So, save yourself the fuss. At that point, it’s a whole new system, and there are better ways to spend your time.
Step 5: Re-engage and Revel in the Quiet – It’s Music to Your Ears
Re-engage that motor and run it a couple of cycles. Listen to that! Your system is already getting quieter with each cycle. It’s like music to your ears.
Don’t be shy with the oil. If you find that your door gets louder or squeakier over time, spray where the squeak is. You can’t over-maintain your system. You can only under-maintain it. Trust me, your ears (and possibly your napping kids) will thank you.
Step 6: Longevity and Enjoyment – The Little Things Matter
Want your springs to last longer? Want a more enjoyable system? Of course you do!
Check your system for any loose bolts or issues with your backings. A little check-up can make a big difference. It’s like giving your garage door a health check. You’re not going to hurt it; you’re just going to help it.
Step 7: Get Your Lubrication Here – Your Garage Door Will Thank You
Need lubrication? We have it available for sale. It’s the good stuff, and we’ll gladly sell it to you. Feel free to ask for a can when we’re at your place. Your garage door will thank you with smooth operation and a longer life.
Feel free to lube it up more than once a year. A well-maintained system is a joy to your ears and will last longer. Check for loose bolts or any issues, and don’t hesitate to ask for professional help.
Wrapping It Up: Your Garage Door Deserves the Best
And that’s how you give your garage door the care and attention it deserves. Remember, a well-oiled garage door is a happy garage door. It doesn’t just make your life easier; it prolongs the door’s life. Learn more about maintaining your garage door at Utah Overhead Door.
You don’t have to be a pro to do this. Just follow these simple steps, and you’ll have a garage door that sounds like the day it was new.

2 Responses